Posted in Rice Bowls

BBQ Pulled Pork Rice Bowl

Simple meals don’t have to be boring. This BBQ Pulled Pork Rice Bowl combines fluffy rice, tender precooked pulled pork, sweet corn, black beans, and a drizzle of your favorite barbecue sauce for a hearty meal that’s ready in about 20 minutes.

Rice bowls are one of the easiest ways to stretch ingredients while creating something that feels fresh and satisfying. They’re also wonderfully flexible—use what you have on hand, swap ingredients to fit your family’s tastes, and make each bowl your own.

Whether you’re cooking at home, in an RV, or at the campground, this Build-A-Bowl meal is an easy way to turn a few simple ingredients into a delicious dinner.


❤️ Why You’ll Love This Recipe

  • Ready in about 20 minutes
  • Great use for precooked pulled pork
  • Budget-friendly and filling
  • Easy to customize
  • Perfect for meal prep lunches
  • Campground friendly

🥣 Build Your Bowl

Build-A-Bowl meals are all about mixing and matching simple ingredients you already have on hand. Start with a base, add a protein, pile on vegetables, then finish with a flavorful sauce and your favorite toppings.

  • 🍚 Base: Cooked Rice
  • 🥩 Protein: Precooked Pulled Pork
  • 🌽 Vegetables: Corn & Black Beans
  • 🥣 Sauce: Your Favorite Barbecue Sauce
  • 🥬 Fresh Finish: Sliced Green Onions
  • ✨ Optional Toppings: Shredded Cheddar Cheese, Plain Greek Yogurt or Sour Cream, Diced Tomatoes, Sliced Avocado, Pickled Jalapeños, Fresh Cilantro

Make It Your Own: No black beans? Use pinto beans. No corn? Try diced bell peppers or leftover roasted vegetables. Build-A-Bowl recipes are designed to be flexible, so use what you have and make each bowl your own.

simplegoodfood's avatarsimplegoodfood

BBQ Pulled Pork Rice Bowl

Ricebowls are one of the easiest ways to stretch ingredients while creatingsomething that feels fresh and satisfying.
Prep Time 10 minutes
Cook Time 10 minutes
Total Time 20 minutes
Servings: 4
Course: Dinner, Lunch, Main Course
Cuisine: American
Calories: 425

Ingredients
  

  • 2 cups cooked rice
  • 2 cups precooked pulled pork
  • 1 cup corn kernels
  • 1 cup black beans drained and rinsed
  • ½ cup barbecue sauce
  • 2 green onions sliced
Optional Toppings
  • Shredded cheddar cheese
  • Sour cream or plain Greek yogurt
  • Diced tomatoes
  • Sliced avocado
  • Fresh cilantro
  • Pickled jalapeños

Method
 

  1. Warm the rice according to package directions or reheat leftover cooked rice.
  2. Heat the pulled pork in a skillet or microwave until hot.
  3. Warm the corn and black beans.
  4. Divide the rice evenly among four bowls.
  5. Top each bowl with pulled pork, corn, and black beans.
  6. Drizzle with barbecue sauce.
  7. Garnish with green onions and any additional toppings you enjoy.
  8. Serve immediately.

Notes

🧺 Kitchen Confidence
This Week’s Skill: Cooking Perfect Rice
Rice is one of the most economical pantry staples you can keep on hand. For fluffy rice, follow the package directions and avoid lifting the lid while it cooks. Once it’s done, let it rest for about 5 minutes before fluffing it gently with a fork.
Already have cooked rice in the refrigerator? That’s even better! Leftover rice reheats beautifully and is perfect for quick meals like this one.
💰 Stretch Every Grocery Dollar
Buying bags of regular long-grain rice instead of instant rice can save money over time. Cook a larger batch and refrigerate or freeze meal-sized portions for quick weeknight dinners.

♻️ Waste Not, Want Not

This recipe is a great way to use small amounts of ingredients already in your refrigerator. Don’t have black beans? Try pinto beans. No corn? Diced bell peppers, leftover roasted vegetables, or even a handful of fresh spinach work well, too.


🍽️ Cooking for One or Two

Assemble only the bowls you’ll eat today and store the ingredients separately for the best texture. Rice, pulled pork, beans, and corn can all be refrigerated for several days, making it easy to enjoy another bowl later in the week.


🥣 Meal Prep Note

Cook extra rice today and refrigerate it. You’ll have it ready for Thursday’s Sweet & Tangy Pork & Veggie Rice Bowl, saving even more time later in the week.


Storage & Freezing

Refrigerator: Store rice and toppings separately in airtight containers for up to 4 days.

Freezer: Cooked rice and pulled pork freeze well for up to 3 months.

Reheating: Reheat the rice with a splash of water to restore moisture before assembling your bowl.
Posted in Heat & Eat, Miscellaneous (Unsorted), Sandwiches, Wraps & Handhelds

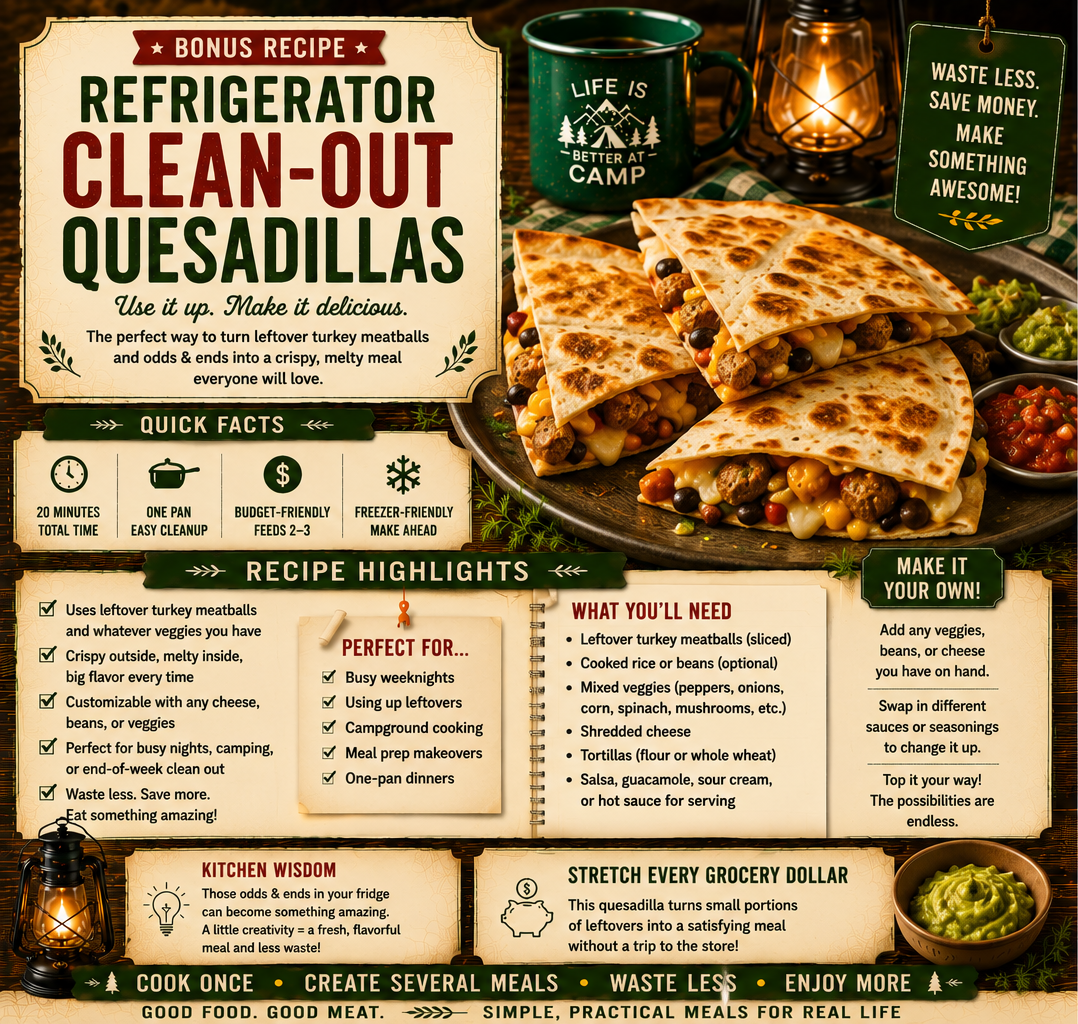
Refrigerator Clean-Out Quesadillas

Quesadillas are one of the easiest “clean out the refrigerator” meals you can make.

Almost any cooked meat, vegetable, or cheese can become a delicious filling. Before buying more groceries, challenge yourself to build one meal using what’s already in your refrigerator. You’ll save money, reduce food waste, and might even discover a new favorite combination.

simplegoodfood's avatarsimplegoodfood

Refrigerator Clean-Out Quesadillas

Almost any leftover meat, vegetables, cheese, or rice can become a quesadilla.
Prep Time 5 minutes
Cook Time 10 minutes
Total Time 15 minutes
Servings: 2
Course: Breakfast, Dinner, Lunch
Cuisine: American
Calories: 510

Ingredients
  

  • 4 large flour tortillas 8-inch
  • 4 –6 cooked turkey meatballs chopped
  • 1 cup shredded cheese Cheddar, Monterey Jack, Mexican blend, or whatever you have
  • 1 cup assorted leftover vegetables chopped
  • o Bell peppers
  • o Onions
  • o Corn
  • o Mushrooms
  • o Spinach
  • o Zucchini
  • o Tomatoes drained
  • o Cooked broccoli
  • 1 teaspoon olive oil or butter
  • Salsa Greek yogurt, or sour cream for serving (optional)

Method
 

  1. Heat a large skillet over medium heat.
  2. Lightly brush one side of each tortilla with olive oil or butter.
  3. Place one tortilla, oiled side down, in the skillet.
  4. Sprinkle half of the cheese over the tortilla.
  5. Add the chopped turkey meatballs and leftover vegetables in an even layer.
  6. Top with the remaining cheese and place the second tortilla on top, oiled side up.
  7. Cook for 3–4 minutes until golden brown.
  8. Carefully flip and cook the second side until crisp and the cheese has melted.
  9. Repeat with the remaining ingredients.
  10. Slice into wedges and serve with salsa, Greek yogurt, or sour cream.

Notes

Tips & Variations
  • Add a spoonful of black beans for extra protein and fiber.
  • Sprinkle in taco seasoning or Italian seasoning to change the flavor.
  • Mix different cheeses for more flavor.
  • Serve with a simple side salad or fresh fruit.
  • Leftover cooked chicken, pork, roast beef, or vegetables work just as well.
Don’t overstuff your quesadilla. It can be tempting to use every last bit of leftovers, but a thinner layer of filling lets the cheese melt around everything like glue. If you have lots of leftovers, make two quesadillas instead of one giant one.

Related Reading

🍽️ Keep Cooking Smarter

Continue building your budget-friendly kitchen with these helpful articles and recipes:

  • Stretch This Week’s Groceries Even Farther
  • Five Ways to Stretch Ground Turkey
  • Freezer & Make-Ahead Meals
  • Pantry Meal Starters
  • Side Dish Library
  • Meal Prep Collections
Posted in Arrival Day Dinner, Breakfast

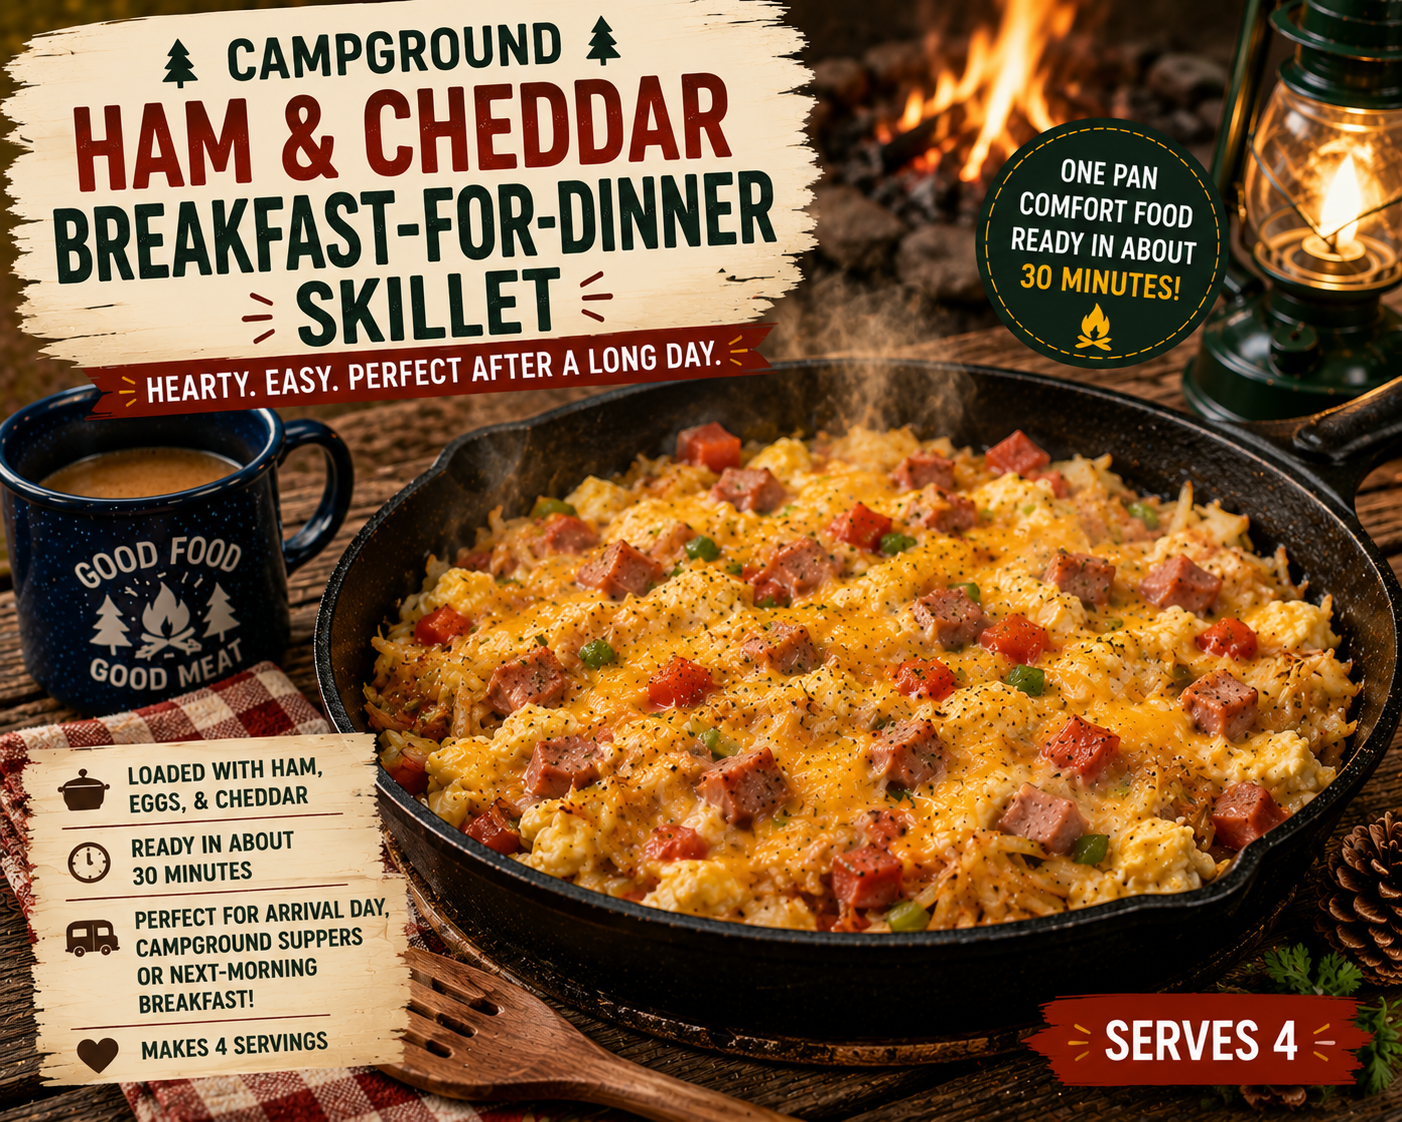
Campground Ham & Cheddar Breakfast-for-Dinner Skillet

After a long day of driving, checking in, and setting up camp, the last thing you want is a complicated dinner. This Campground Ham & Cheddar Breakfast-for-Dinner Skillet comes together in one pan with simple ingredients that are easy to keep in the cooler.

It’s hearty enough for supper, quick enough for arrival day, and just as delicious for breakfast the next morning.

simplegoodfood's avatarsimplegoodfood

Campground Ham & Cheddar Breakfast-for-Dinner Skillet

It's hearty enough for supper, quick enough for arrival day, and just as delicious for breakfast the next morning.
Prep Time 10 minutes
Cook Time 20 minutes
Total Time 30 minutes
Servings: 4
Course: Breakfast, Dinner
Cuisine: American
Calories: 390

Ingredients
  

  • 1 tablespoon butter
  • 2 cups frozen hash browns or refrigerated shredded potatoes
  • 1 cup diced cooked ham
  • ½ cup diced onion
  • ½ cup diced bell pepper
  • 6 large eggs
  • ¼ cup milk
  • 1 teaspoon garlic powder
  • ½ teaspoon onion powder
  • ½ teaspoon smoked paprika
  • Salt and black pepper to taste
  • 1 cup shredded sharp cheddar cheese
  • Chopped parsley or green onions for garnish optional

Method
 

  1. Heat the butter in a large cast-iron skillet over medium heat.
  2. Add the hash browns and cook for 8–10 minutes until lightly browned.
  3. Stir in the ham, onion, and bell pepper. Cook another 4–5 minutes.
  4. Whisk together the eggs, milk, garlic powder, onion powder, smoked paprika, salt, and pepper.
  5. Pour the egg mixture evenly over the skillet.
  6. Reduce heat to medium-low and cook until the eggs begin to set.
  7. Sprinkle the cheddar cheese over the top.
  8. Cover with a lid for 3–4 minutes until the cheese melts and the eggs are fully cooked.
  9. Garnish with parsley or green onions before serving.

Notes

Easy Substitutions
  • Ham: Cooked bacon, breakfast sausage, turkey sausage, or leftover grilled chicken all work well.
  • Hash Browns: Diced potatoes or leftover roasted potatoes make a great substitute.
  • Cheddar: Colby Jack, Monterey Jack, Swiss, or Pepper Jack (for those who like a little heat).
  • Vegetables: Mushrooms, spinach, tomatoes, or zucchini can be added depending on what’s in the cooler.
Camp Cook’s Tips
  • Cook the hash browns until they’re nicely browned before adding the eggs for the best texture.
  • Covering the skillet helps the eggs cook evenly without burning the bottom.
  • A cast-iron skillet retains heat well, making it ideal for camp cooking.
  • Prep the onion and pepper at home to make arrival-day cooking even faster.
Serving Suggestions
  • Buttered toast or English muffins
  • Fresh fruit
  • Orange juice
  • Camp coffee
  • Salsa or hot sauce on the side
Storage
Refrigerate leftovers in an airtight container for up to 3 days.
Reheat gently in a skillet or microwave.
🥪 Leftover Lunch Idea
Slice leftover skillet into wedges and tuck one into an English muffin or tortilla for an easy breakfast sandwich before heading out for the day’s adventures.
Stretch Your Camping Dollar
This recipe is perfect for using up leftover holiday ham or the last few slices from sandwich lunches. You can also toss in vegetables that need to be used before heading home, making it a great way to reduce food waste while creating a filling meal.

#GoodFoodGoodMeat, #SimplePracticalMeals, #RealFoodRealLife,
#SummerCampgroundMeals, #CookingForOneOrTwo, #BreakfastForDinner, #CampgroundCooking, #OneSkilletMeal, #CampingRecipes, #HamAndCheddar, #EasyCampingMeals, #RVRecipes, #CastIronCooking, #ArrivalDayMeals, #CampBreakfast, #QuickDinner, #OutdoorCooking,

Posted in Skillet Meals

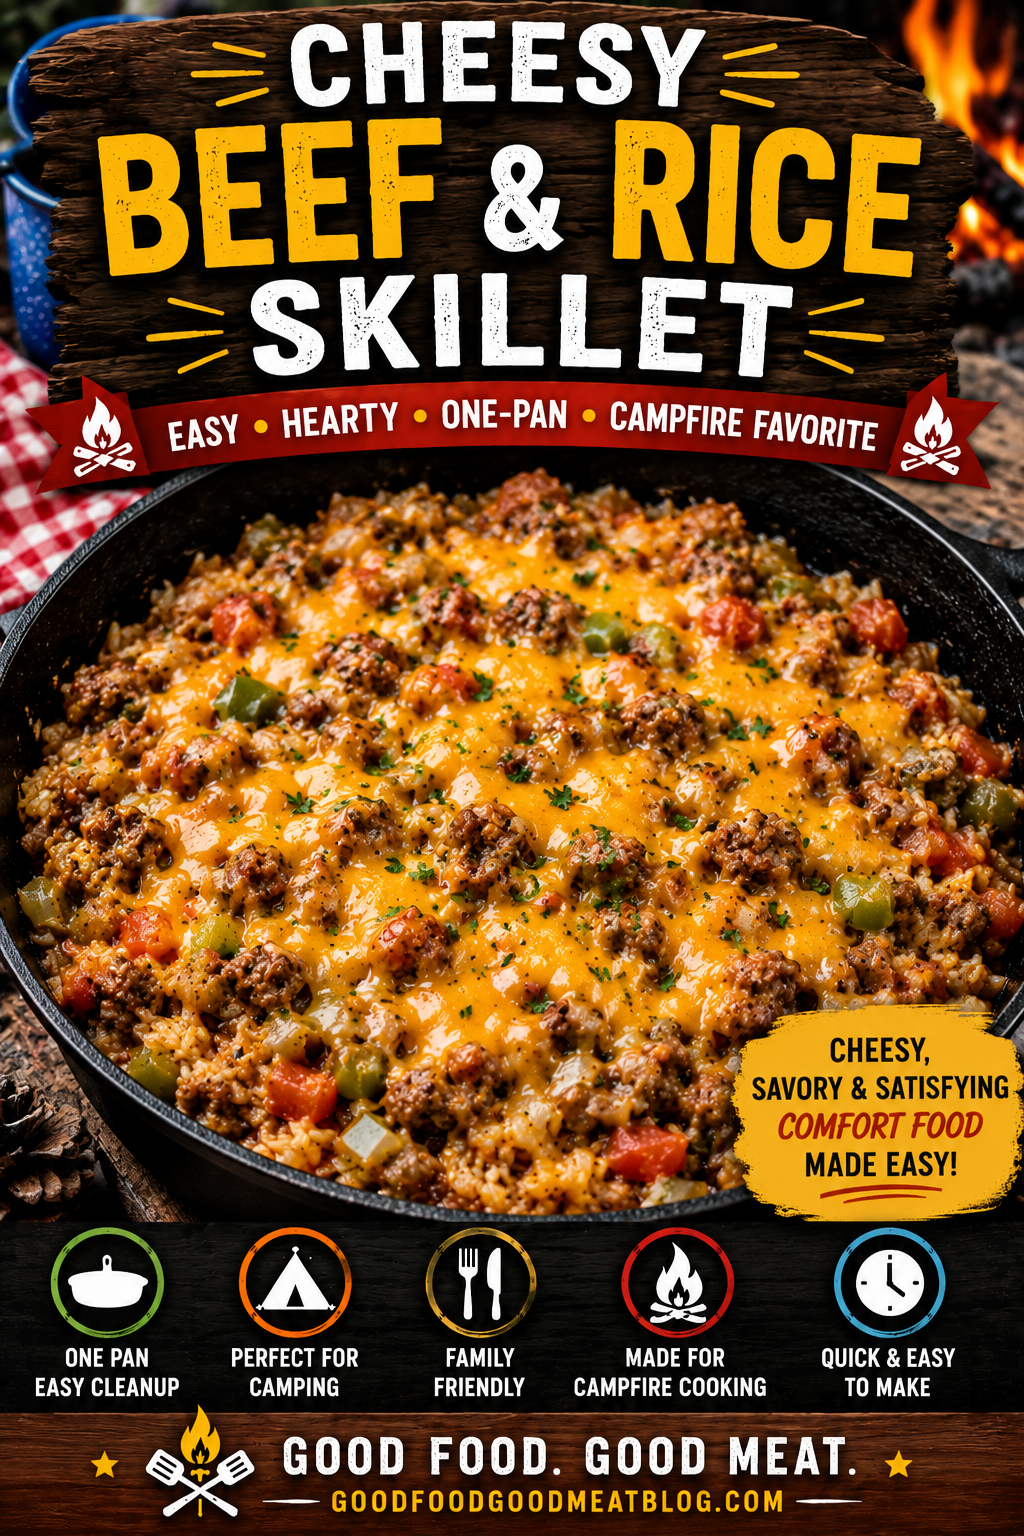
Cheesy Beef & Rice Skillet

After a busy day of campground adventures, sometimes the best meals are the simplest ones. This Cheesy Beef & Rice Skillet is a hearty, one-pan dinner packed with seasoned ground beef, tender rice, tomatoes, and plenty of melted cheese. It’s easy to make on a camp stove, Blackstone griddle, or over a campfire skillet, making it a perfect addition to your campground meal rotation.

With simple ingredients and minimal cleanup, this family-friendly meal delivers big comfort-food flavor without spending all evening cooking.

simplegoodfood's avatarsimplegoodfood

Cheesy Beef & Rice Skillet

After a busy day of campground adventures, sometimes the best meals are the simplest ones.
Prep Time 10 minutes
Cook Time 30 minutes
Total Time 40 minutes
Servings: 6
Course: Dinner, Lunch, Main Course
Cuisine: American
Calories: 470

Ingredients
  

  • 1½ pounds lean ground beef
  • 1 small onion diced
  • 2 cloves garlic minced
  • 1 14.5-ounce can diced tomatoes, undrained
  • 2 cups low-sodium beef broth
  • 1 cup long-grain white rice
  • 1 teaspoon Italian seasoning
  • ½ teaspoon smoked paprika
  • ½ teaspoon black pepper
  • 1½ cups shredded cheddar cheese
  • 2 tablespoons chopped parsley optional

Method
 

  1. Heat a large skillet over medium heat.
  2. Add the ground beef and diced onion.
  3. Cook until the beef is browned and the onion is softened, about 6–8 minutes.
  4. Drain excess grease if necessary.
  5. Stir in the garlic and cook for 30 seconds.
  6. Add:
  7. o Diced tomatoes
  8. o Beef broth
  9. o Rice
  10. o Italian seasoning
  11. o Smoked paprika
  12. o Black pepper
  13. Stir well and bring the mixture to a gentle boil.
  14. Reduce heat to low and cover.
  15. Simmer for 18–20 minutes, or until the rice is tender and most of the liquid has been absorbed.
  16. Remove from heat and sprinkle the shredded cheddar cheese evenly over the top.
  17. Cover for 2–3 minutes until the cheese melts.
  18. Garnish with parsley and serve.

Notes

Campground Prep Tip
Brown the ground beef and chop the onion at home before your trip. Store them together in a sealed container in the cooler. At camp, simply combine the ingredients and let the skillet do the work.
Rainy Day Campground Option
Don’t let bad weather derail dinner plans. This Cheesy Beef & Rice Skillet works just as well in an electric skillet inside an RV, cabin, or enclosed campsite shelter.
Simply:
  • Brown the beef and onions in the electric skillet.
  • Stir in the remaining ingredients except the cheese.
  • Cover and cook according to your skillet manufacturer’s directions, stirring occasionally.
  • Once the rice is tender, top with cheese, cover, and allow it to melt before serving.
An electric skillet makes this recipe a reliable backup meal when rain, wind, or campground fire restrictions make outdoor cooking difficult.

#CampingRecipes, #CampgroundMeals, #SkilletDinner, #OnePanMeals, #CampingFood, #OutdoorCooking, #RVRecipes, #EasyDinnerIdeas, #GroundBeefRecipes, #FamilyCamping, #ComfortFood, #CampfireCooking, #CampingLife, #QuickMeals, #CheesyRecipes,

Posted in Campground Meals, Cold/No Heat Meals, Sandwiches, Wraps & Handhelds

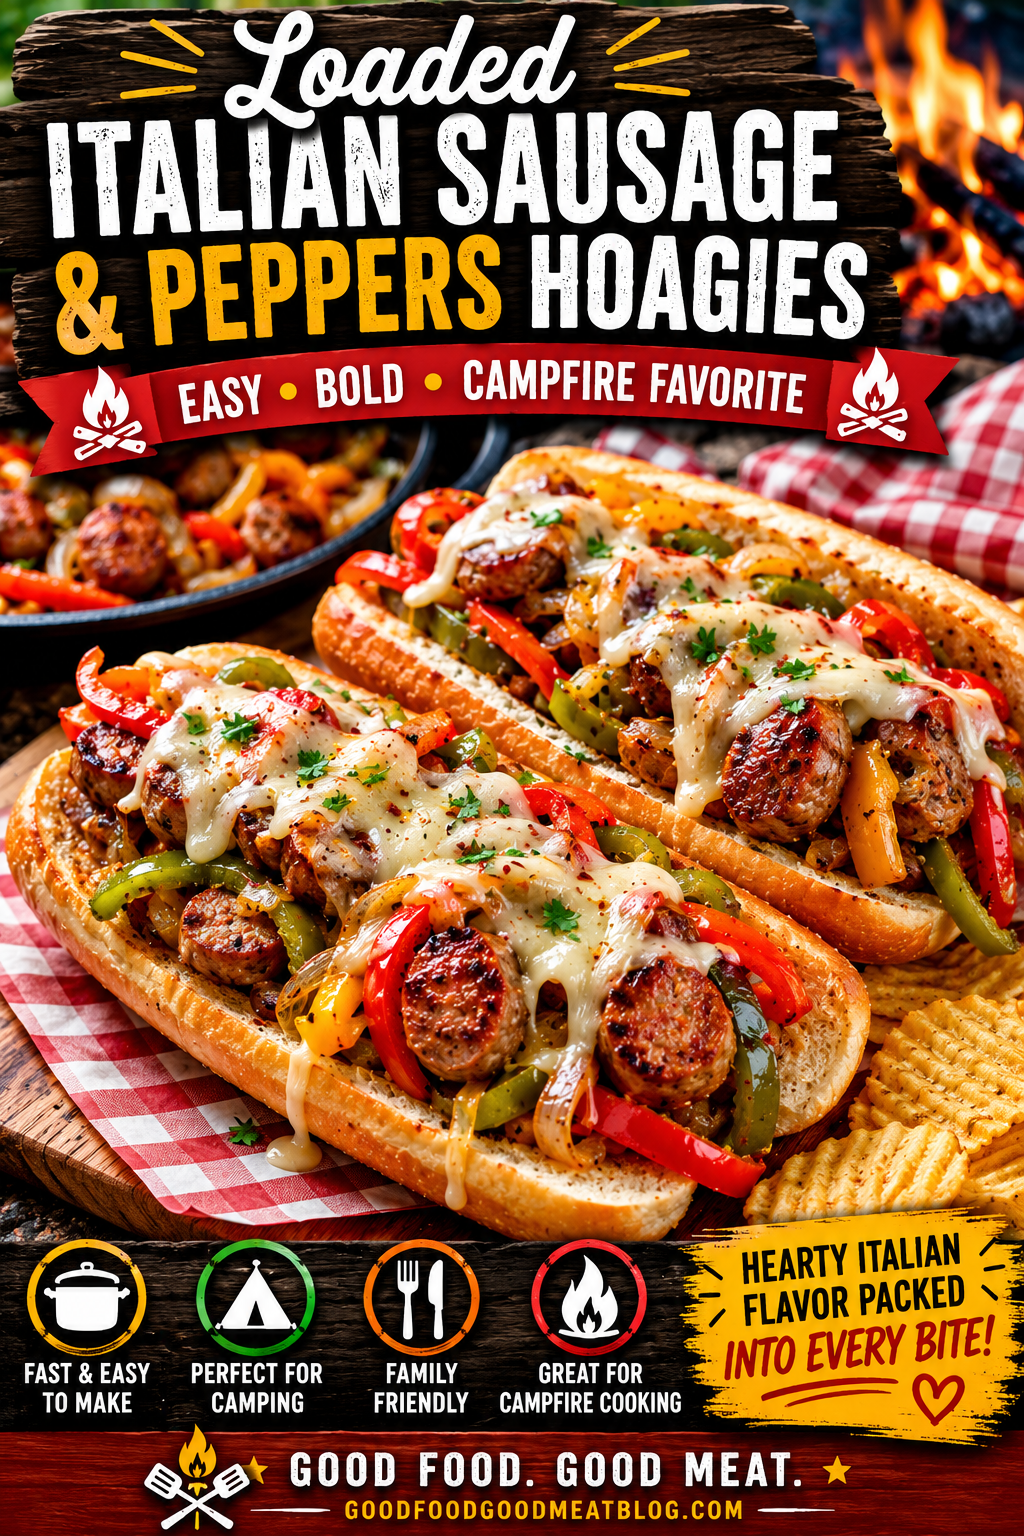
Loaded Italian Sausage & Peppers Hoagies

When it comes to easy campground meals, it’s hard to beat a hearty sausage sandwich loaded with savory peppers and onions. These Loaded Italian Sausage & Peppers Hoagies are packed with bold flavors, require minimal cleanup, and come together quickly in a single skillet. Whether you’re cooking over a camp stove, flat-top griddle, or campfire skillet, this meal is sure to become a camping favorite.

Serve these hoagies with chips, potato salad, or fresh fruit for a satisfying dinner that’s perfect after a day of hiking, fishing, or exploring the campground.

simplegoodfood's avatarsimplegoodfood

Loaded Italian Sausage & Peppers Hoagies

When it comes to easy campground meals, it's hard to beat a hearty sausage sandwich loaded with savory peppers and onions.
Prep Time 10 minutes
Cook Time 25 minutes
Total Time 35 minutes
Servings: 6
Course: Dinner, Lunch, Main Course
Cuisine: American
Calories: 520

Ingredients
  

  • 6 Italian sausage links mild or hot
  • 1 tablespoon olive oil
  • 2 bell peppers sliced (any color)
  • 1 large onion sliced
  • 1 teaspoon Italian seasoning
  • ½ teaspoon garlic powder
  • ¼ teaspoon black pepper
  • 6 hoagie rolls
  • 6 slices provolone cheese optional
  • ¼ cup grated Parmesan cheese optional

Method
 

  1. Heat olive oil in a large skillet over medium heat.
  2. Add the sausage links and cook, turning occasionally, until browned and cooked through, about 12–15 minutes. Remove from skillet and keep warm.
  3. Add the sliced peppers and onions to the same skillet.
  4. Sprinkle with Italian seasoning, garlic powder, and black pepper.
  5. Cook for 8–10 minutes, stirring occasionally, until vegetables are tender and lightly caramelized.
  6. Return the sausages to the skillet and cook for 2–3 minutes to combine flavors.
  7. Place each sausage in a hoagie roll and top generously with the pepper and onion mixture.
  8. Add provolone cheese and Parmesan cheese if desired.
  9. Serve immediately.

Notes

Campground Prep Tip
Slice the peppers and onions at home and store them in a zip-top bag in your cooler. This reduces prep time and makes campsite cooking even easier.

#CampingRecipes, #CampgroundCooking, #RVRecipes, #CampingFood, #OutdoorCooking, #ItalianSausage, #SausageAndPeppers, #EasyDinnerRecipes, #FamilyCamping, #CampgroundMeals, #SummerCamping, #SkilletMeals, #QuickDinnerIdeas, #CampingLife, #Hoagies,

Posted in Heat & Eat

Loaded BBQ Chicken Nachos

When you’re camping, quick and easy meals are always a win—and these Loaded BBQ Chicken Nachos deliver big flavor with minimal effort. Layers of crispy tortilla chips, tender chicken, smoky barbecue sauce, melted cheese, and fresh toppings come together in a foil pan on the grill or campfire. They’re perfect for feeding hungry campers after a day of outdoor adventures and make a fun meal everyone can customize to their liking.

simplegoodfood's avatarsimplegoodfood

Loaded BBQ Chicken Nachos

Loaded BBQ Chicken Nachos are a quick and satisfying campground meal featuring layers of tortilla chips, barbecue chicken, melted cheese, black beans, and corn. Easy to prepare and fun to share around the campsite.
Prep Time 10 minutes
Cook Time 15 minutes
Total Time 25 minutes
Servings: 6
Course: Lunch, Snack
Cuisine: American
Calories: 510

Ingredients
  

For the Nachos
  • 1 large bag 13 ounces sturdy tortilla chips
  • 3 cups cooked chicken shredded (rotisserie chicken works great)
  • 1 cup barbecue sauce
  • 2 cups shredded cheddar cheese
  • 1 cup shredded Monterey Jack cheese
  • 1 can 15 ounces black beans, drained and rinsed
  • 1 cup corn kernels fresh, frozen, or canned and drained
  • ¼ cup sliced green onions
Optional Toppings
  • Diced tomatoes
  • Sliced jalapeños
  • Sour cream
  • Avocado or guacamole
  • Chopped cilantro

Method
 

  1. Preheat a grill to medium heat or prepare a campfire with a bed of hot coals.
  2. In a bowl, combine the shredded chicken and barbecue sauce until evenly coated.
  3. Lightly spray a disposable foil pan with cooking spray.
  4. Spread half of the tortilla chips in the pan.
  5. Top with half of the BBQ chicken, black beans, corn, and both cheeses.
  6. Repeat the layers with the remaining chips, chicken mixture, beans, corn, and cheese.
  7. Cover the pan loosely with aluminum foil.
  8. Place on the grill or over indirect campfire heat.
  9. Cook for 10–15 minutes, or until the cheese is completely melted and bubbly.
  10. Remove from heat and sprinkle with green onions.
  11. Add any desired toppings and serve immediately.