Posted in Grilled Meals

Grilled Italian Sausage & Vegetable Kabobs

These Grilled Italian Sausage & Vegetable Kabobs are a colorful, hearty meal that’s perfect for campground grilling. Smoky Italian sausage pairs beautifully with fresh bell peppers, onions, zucchini, and mushrooms for a simple dinner that’s packed with flavor and requires very little cleanup.

Assemble the kabobs before you leave home or while relaxing at camp, then grill until the vegetables are tender and lightly charred. Serve with rice, potatoes, or a slice of crusty bread for an easy meal everyone will enjoy.

simplegoodfood's avatarsimplegoodfood

Grilled Italian Sausage & Vegetable Kabobs

Fire up the grill for these easy Grilled Italian Sausage & Vegetable Kabobs!
Prep Time 15 minutes
Cook Time 15 minutes
Marinating (Optional) 30 minutes
Total Time 45 minutes
Servings: 4
Course: Dinner, Lunch
Cuisine: American
Calories: 460

Ingredients
  

  • 1 pound Italian sausage links mild or sweet
  • 2 bell peppers red, yellow, or green, cut into 1½-inch pieces
  • 1 medium zucchini sliced into thick rounds
  • 1 medium red onion cut into wedges
  • 8 ounces whole button mushrooms
  • 2 tablespoons olive oil
  • 1 teaspoon Italian seasoning
  • ½ teaspoon garlic powder
  • Salt and black pepper to taste
  • Wooden or metal skewers

Method
 

  1. If using wooden skewers, soak them in water for at least 30 minutes.
  2. Cut each sausage link into 2- to 3-inch pieces.
  3. In a large bowl, combine the peppers, zucchini, onion, and mushrooms.
  4. Drizzle with olive oil and season with Italian seasoning, garlic powder, salt, and pepper. Toss to coat evenly.
  5. Alternate sausage and vegetables on the skewers.
  6. Preheat the grill to medium heat.
  7. Grill the kabobs for 12–15 minutes, turning every few minutes until the sausage reaches 160°F and the vegetables are tender with light grill marks.
  8. Let rest for 3–5 minutes before serving.

Notes

Camp Cook’s Tips
  • Prepare the kabobs at home and store them in a covered container in the cooler until ready to grill.
  • Use colorful bell peppers for a brighter presentation.
  • Cherry tomatoes can be added during the last few minutes of grilling.
  • Brush with a little barbecue sauce during the final two minutes for a smoky-sweet finish.
Serving Suggestions
  • Seasoned rice
  • Campfire baked potatoes
  • Corn on the cob
  • Pasta salad
  • Fresh watermelon
  • Crusty Italian bread
Storage
Store leftover sausage and vegetables in an airtight container in the refrigerator for up to 3 days.
Reheat gently in a skillet or microwave until warmed through.
🥪 Leftover Lunch Idea
Slice the leftover sausage and vegetables and tuck them into a toasted hoagie roll with provolone cheese for an easy campground sausage sandwich.
They’re also delicious chopped and served over leftover rice for a quick lunch bowl.

#GoodFoodGoodMeat, #SimplePracticalMeals, #RealFoodRealLife
#CookingForOneOrTwo, #SummerCampgroundMeals,

#CampgroundCooking, #GrilledMeals, #ItalianSausage, #Kabobs,
#CampingRecipes, #RVCooking, #OutdoorCooking, #EasyDinnerIdeas,
#GrillSeason, #OneSkewerDinner, #CampfireCooking, #SimpleSuppers,

Posted in Grilled Meals

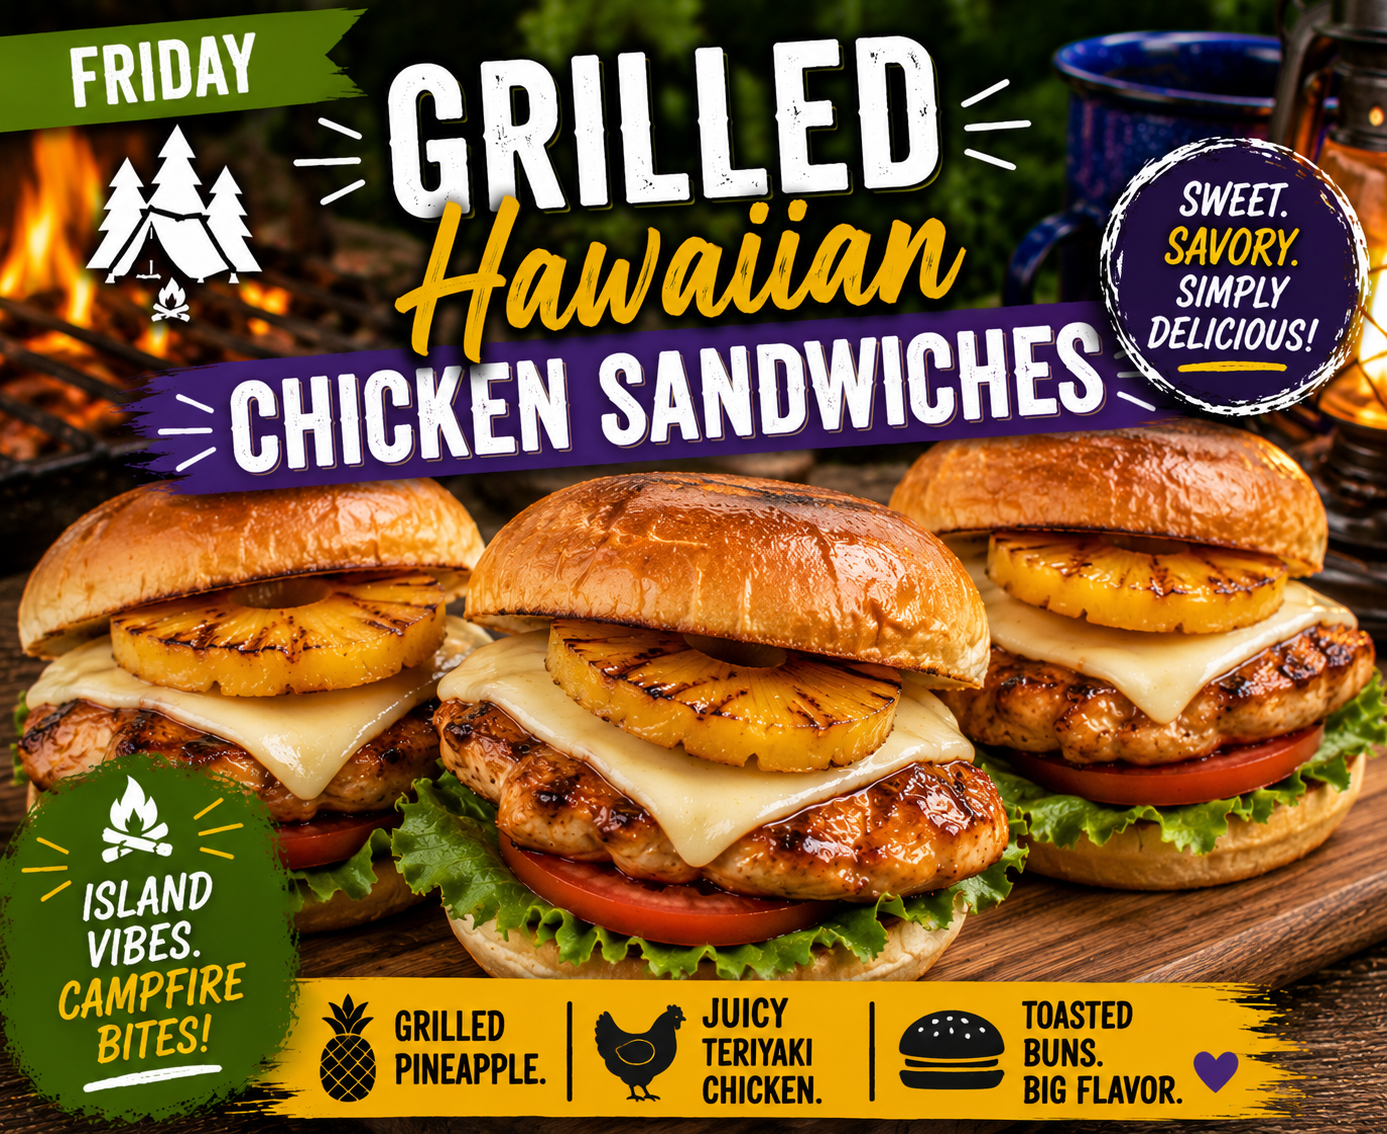
Grilled Hawaiian Chicken Sandwiches

Bring a taste of the islands to your campground with these Grilled Hawaiian Chicken Sandwiches. Juicy grilled chicken is brushed with a sweet and savory teriyaki glaze, then topped with caramelized pineapple and served on toasted buns. It’s an easy summer meal that feels a little special while still being simple enough for campground cooking.

simplegoodfood's avatarsimplegoodfood

Grilled Hawaiian Chicken Sandwiches

TheseGrilled Hawaiian Chicken Sandwiches feature juicy teriyaki chicken, meltedprovolone cheese, and sweet grilled pineapple on a toasted bun.
Prep Time 15 minutes
Cook Time 20 minutes
Total Time 35 minutes
Servings: 6
Course: Dinner, Lunch, Main Course
Cuisine: American
Calories: 465

Ingredients
  

For the Chicken
  • pounds boneless skinless chicken breasts
  • ¼ cup teriyaki sauce
  • 1 tablespoon olive oil
  • ½ teaspoon garlic powder
  • ¼ teaspoon black pepper
For the Sandwiches
  • 6 pineapple rings fresh or canned, drained
  • 6 sandwich buns
  • 6 slices provolone cheese
  • 6 lettuce leaves
  • 6 tomato slices
  • Additional teriyaki sauce for brushing

Method
 

  1. Pound the chicken breasts to an even thickness if needed.
  2. In a bowl, combine the teriyaki sauce, olive oil, garlic powder, and black pepper.
  3. Add the chicken and marinate for at least 30 minutes, or overnight in a cooler.
  4. Preheat a grill to medium-high heat.
  5. Grill the chicken for 6–7 minutes per side, or until it reaches an internal temperature of 165°F.
  6. During the last few minutes of cooking, grill the pineapple rings until lightly caramelized.
  7. Place a slice of provolone cheese on each chicken breast and allow it to melt.
  8. Toast the sandwich buns on the grill for 1–2 minutes.
  9. Assemble each sandwich with lettuce, tomato, grilled chicken, and a grilled pineapple ring.
  10. Brush with additional teriyaki sauce if desired and serve immediately.

Notes

Campground Tips
  • Marinate the chicken before leaving home for even more flavor.
  • Fresh pineapple grills beautifully, but canned pineapple rings work well and are easier to transport.
  • Serve with pasta salad, baked beans, or kettle chips for a complete campground meal.

#CampgroundCooking, #RVMeals, #OnePanDinner, #EasySummerDinners, #ComfortFoodRecipes, #ElectricSkilletMeals, #EasyDinnerIdeas, #BudgetFriendlyMeals,
#SummerCooking, #SkilletDinner, #SimpleSuppers, #FamilyDinnerIdeas,
#EasyWeeknightDinner, #WhatsForDinner,

Posted in One-Pot Meals

Southwest Beef & Rice Stuffed Peppers

These Southwest Beef & Rice Stuffed Peppers bring bold flavors to the campground table. Colorful bell peppers are filled with seasoned ground beef, rice, tomatoes, and melted cheese, then baked until tender. They’re hearty enough to serve as a complete meal while adding plenty of color and flavor to your camping menu.

Southwest Beef & Rice Stuffed Peppers

TheseSouthwest Beef & Rice Stuffed Peppers are loaded with seasoned beef, rice,tomatoes, corn, and melted cheese.
Prep Time 15 minutes
Cook Time 40 minutes
Total Time 55 minutes
Servings: 6
Course: Dinner, Lunch, Main Course
Cuisine: American
Calories: 430

Ingredients
  

  • 6 large bell peppers any color
  • pounds lean ground beef
  • 1 small onion diced
  • 1 teaspoon olive oil
  • 1 cup cooked brown rice
  • 1 can 10 ounces diced tomatoes with green chilies, drained
  • 1 cup corn kernels
  • 1 teaspoon chili powder
  • 1 teaspoon cumin
  • ½ teaspoon garlic powder
  • ½ teaspoon black pepper
  • ½ teaspoon salt
  • cups shredded Mexican-blend cheese divided
  • 2 tablespoons chopped cilantro optional

Method
 

  1. Cut the tops off the bell peppers and remove the seeds and membranes.
  2. Bring a large pot of water to a boil and blanch the peppers for 3 minutes. Drain and set aside.
  3. Heat olive oil in a Dutch oven or large skillet over medium heat.
  4. Add the ground beef and onion. Cook until the beef is browned and the onion is tender.
  5. Stir in the cooked rice, diced tomatoes, corn, chili powder, cumin, garlic powder, salt, and pepper.
  6. Cook for 3–4 minutes until heated through.
  7. Remove from heat and stir in 1 cup of the shredded cheese.
  8. Fill each pepper with the beef and rice mixture.
  9. Arrange peppers upright in a Dutch oven or covered baking dish.
  10. Cover and bake for 25–30 minutes until the peppers are tender.
  11. Sprinkle the remaining cheese over the tops and cook for an additional 5 minutes, or until melted.
  12. Garnish with cilantro if desired and serve.

Notes

Campground Tips
  • Cook the rice at home and store it in the cooler to save time at camp.
  • If using a Dutch oven, place a small rack or a layer of foil balls underneath the peppers to help prevent scorching.
  • Leftover filling makes a great burrito or taco filling the next day.

CampgroundCooking, #RVMeals, #OnePanDinner, #EasySummerDinners,

#ComfortFoodRecipes, #ElectricSkilletMeals, #EasyDinnerIdeas, #BudgetFriendlyMeals,
#SummerCooking, #SkilletDinner, #SimpleSuppers, #FamilyDinnerIdeas,
#EasyWeeknightDinner, #WhatsForDinner,

Posted in One-Pot Meals

Campfire Chicken Alfredo Pasta

Few meals are as comforting after a day outdoors as a creamy bowl of pasta. This Campfire Chicken Alfredo Pasta combines tender chicken, pasta, and a rich Parmesan Alfredo sauce in one pot, making it an easy campground dinner with minimal cleanup. Whether you’re cooking over a camp stove or a campfire grate, this recipe delivers big flavor with simple ingredients.

Campfire Chicken Alfredo

Creamy, comforting, and made in one pot! This Campfire Chicken Alfredo Pasta is packed with tender chicken, Parmesan cheese, and pasta for an easy campground dinner with minimal cleanup.
Prep Time 10 minutes
Cook Time 25 minutes
Total Time 35 minutes
Servings: 6
Course: Dinner, Lunch, Main Course
Cuisine: American
Calories: 540

Ingredients
  

  • pounds boneless skinless chicken breasts, cut into bite-sized pieces
  • 2 tablespoons olive oil
  • 3 cloves garlic minced
  • 12 ounces penne pasta
  • 4 cups low-sodium chicken broth
  • 1 cup milk
  • 4 ounces reduced-fat cream cheese softened
  • 1 cup grated Parmesan cheese
  • 1 teaspoon Italian seasoning
  • ½ teaspoon black pepper
  • ¼ teaspoon salt
  • 2 tablespoons chopped parsley optional

Method
 

  1. Heat the olive oil in a large Dutch oven or heavy stockpot over medium heat.
  2. Add the chicken and cook for 5–6 minutes until lightly browned.
  3. Stir in the garlic and cook for 30 seconds.
  4. Add the chicken broth, milk, Italian seasoning, salt, and pepper.
  5. Bring the mixture to a gentle boil.
  6. Stir in the penne pasta and reduce heat to a simmer.
  7. Cover and cook for 12–15 minutes, stirring occasionally, until the pasta is tender.
  8. Stir in the cream cheese until completely melted and incorporated.
  9. Add the Parmesan cheese and stir until the sauce is smooth and creamy.
  10. Remove from heat and let stand for 3–5 minutes to thicken slightly.

Notes

Campground Tips
  • Dice the chicken and measure ingredients before leaving home for faster meal prep.
  • Add steamed broccoli or peas during the last few minutes of cooking for extra vegetables.
  • Keep extra broth on hand if cooking over a campfire, as evaporation rates can vary.

CampgroundCooking, #RVMeals, #OnePanDinner, #EasySummerDinners, #ComfortFoodRecipes, #ElectricSkilletMeals, #EasyDinnerIdeas, #BudgetFriendlyMeals,
#SummerCooking, #SkilletDinner, #SimpleSuppers, #FamilyDinnerIdeas,
#EasyWeeknightDinner, #WhatsForDinner,

Posted in One-Pot Meals

Dutch Oven Sloppy Joe Casserole

This Dutch Oven Sloppy Joe Casserole takes a classic family favorite and turns it into a hearty campground meal. Savory seasoned beef is simmered in a rich sloppy joe sauce, then topped with fluffy biscuit pieces and baked until golden brown. It’s comfort food at its finest and a perfect meal for feeding hungry campers after a day outdoors.

simplegoodfood's avatarsimplegoodfood

Dutch Oven Sloppy Joe Casserole

This Dutch Oven Sloppy Joe Casserole takes a classic family favorite and turns itinto a hearty campground meal.
Prep Time 15 minutes
Cook Time 35 minutes
Total Time 50 minutes
Servings: 6
Course: Dinner, Lunch, Main Course
Cuisine: American
Calories: 510

Ingredients
  

For the Sloppy Joe Filling
  • pounds lean ground beef
  • 1 medium onion diced
  • 1 green bell pepper diced
  • 2 cloves garlic minced
  • 1 cup tomato sauce
  • ¼ cup ketchup
  • 1 tablespoon Worcestershire sauce
  • 1 tablespoon brown sugar
  • 1 teaspoon yellow mustard
  • ½ teaspoon black pepper
  • ½ teaspoon salt
For the Topping
  • 1 can 16.3 ounces refrigerated biscuit dough
  • 1 cup shredded cheddar cheese

Method
 

  1. Preheat a 12-inch Dutch oven.
  2. Brown the ground beef with the onion and bell pepper until the beef is no longer pink. Drain excess grease if needed.
  3. Stir in the garlic and cook for 1 minute.
  4. Add tomato sauce, ketchup, Worcestershire sauce, brown sugar, mustard, salt, and pepper.
  5. Simmer for 10 minutes, stirring occasionally.
  6. Cut each biscuit into quarters and scatter evenly over the sloppy joe mixture.
  7. Sprinkle with shredded cheddar cheese.
  8. Cover the Dutch oven and bake using approximately 16 coals on top and 8 underneath for 20–25 minutes, or until the biscuits are golden brown and cooked through.
  9. Allow to rest for 5 minutes before serving.

Notes

Campground Tips
  • Brown the beef and prepare the filling at home for even faster campsite cooking.
  • If using a camp oven over a grill, maintain medium heat and rotate the oven occasionally for even baking.
  • Serve with a simple green salad or coleslaw.
Posted in Foil Packets

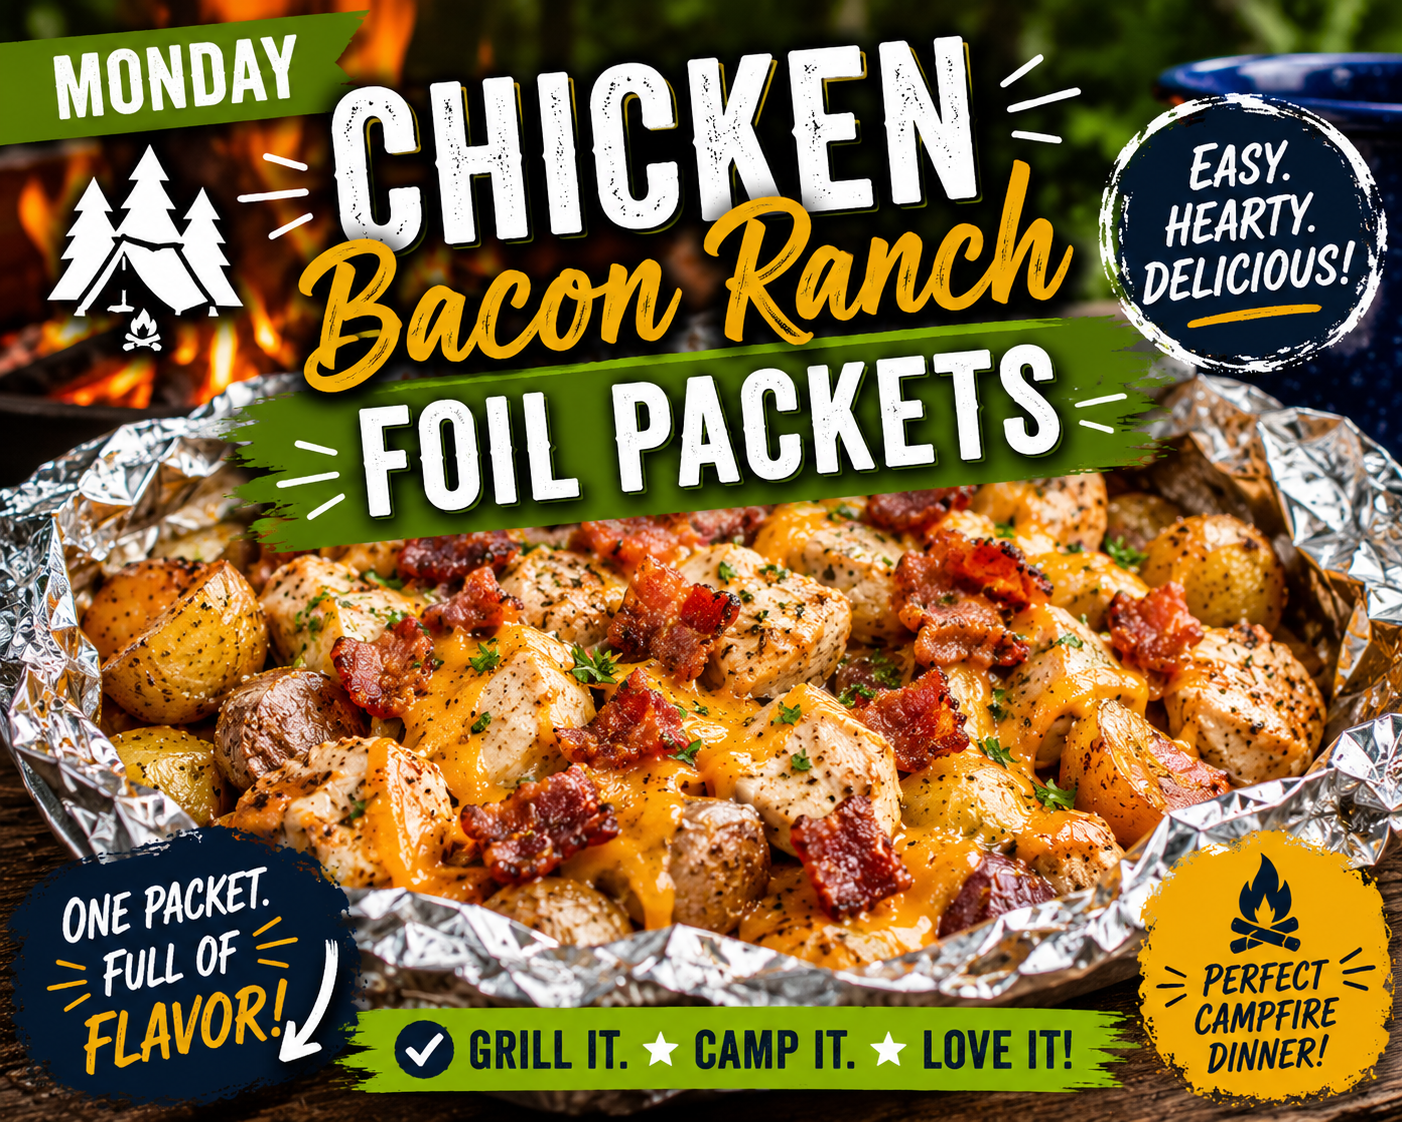
Chicken Bacon Ranch Foil Packets

When it comes to easy campground dinners, foil packet meals are hard to beat. These Chicken Bacon Ranch Foil Packets combine juicy chicken, tender potatoes, smoky bacon, and ranch seasoning in one convenient package. Everything cooks together on the grill or over the campfire, making cleanup a breeze and leaving you with a hearty meal everyone will enjoy.

simplegoodfood's avatarsimplegoodfood

Chicken Bacon Ranch Foil Packets

When it comes to easy campground dinners, foil packet meals are hard to beat.
Prep Time 15 minutes
Cook Time 35 minutes
Total Time 50 minutes
Servings: 6
Course: Dinner, Lunch, Main Course
Cuisine: American
Calories: 485

Ingredients
  

  • pounds boneless skinless chicken breasts, cut into bite-sized pieces
  • pounds baby potatoes halved
  • 8 slices bacon cooked and crumbled
  • 1 tablespoon olive oil
  • 1 ounce ranch seasoning mix
  • 1 teaspoon garlic powder
  • ½ teaspoon black pepper
  • 1 cup shredded cheddar cheese
  • 2 tablespoons chopped parsley optional
  • Heavy-duty aluminum foil

Method
 

  1. Preheat a grill to medium heat or prepare a campfire with a bed of hot coals.
  2. In a large bowl, combine chicken, potatoes, olive oil, ranch seasoning, garlic powder, and black pepper.
  3. Divide the mixture evenly among six large sheets of heavy-duty foil.
  4. Fold and seal each packet tightly.
  5. Place packets on the grill grate or over hot coals.
  6. Cook for 30–35 minutes, turning once halfway through cooking.
  7. Carefully open packets and check that the chicken reaches 165°F and potatoes are tender.
  8. Sprinkle with crumbled bacon and cheddar cheese.
  9. Close packets loosely for 2–3 minutes to allow the cheese to melt.
  10. Garnish with parsley and serve.

Notes

Campground Tips
  • Assemble the packets at home and store them in a cooler until ready to cook.
  • Sweet potatoes can be substituted for baby potatoes for a slightly sweeter flavor.
  • Add broccoli florets during the last 10 minutes of cooking for extra vegetables.

CampgroundCooking, #RVMeals, #OnePanDinner, #SmokedSausageRecipes, #EasySummerDinners,

#ComfortFoodRecipes, #ElectricSkilletMeals, #EasyDinnerIdeas, #BudgetFriendlyMeals,
#SummerCooking, #SkilletDinner, #SimpleSuppers, #FamilyDinnerIdeas,
#PotatoRecipes, #EasyWeeknightDinner, #WhatsForDinner,