Posted in Curated Recipe Lists

58 Easy Grilling Recipes To Keep in Your Back Pocket

All it takes is a few simple recipes (and a sunny day) for laid-back barbecues and breezy alfresco family meals to come together with ease.

Simple Grilling Ideas You’ll Use All Season Long

The summer is all about taking it easy. When it comes to mealtime that means moving our cooking outdoors and firing up the grill. Once we give the grill a deep clean and follow a few simple steps to get it set up, we’re ready to cook outside all season long. Whether we’re grilling pizzas for the weekend, mouthwatering mains like chicken or pork chops for a weeknight dinner or appetizers for a cookout crowd, there’s just no matching the smoky flavor and perfect char of food that has come off the grill. Grilling can be intimidating at first — but we’re here to tell you that it’s not difficult to master. Once you get the hang of setting up two different heat zones, all you need is a handful of recipes you can rely on. That’s where these easy-peasy picks come in. You’ll find everything you need to keep you cooking outside all summer long, from burgers and steaks to veggies and desserts.

One of our favorite places to start? Sunny’s easy pork chops. They spend a little time in a marinade of honey, oil, vinegar, cumin and red pepper flakes before getting a quick sear on the grill (they’re done in just 7 minutes) — and they cook up juicy and flavorful every time.
Food Network

Posted in One-Pot Meals

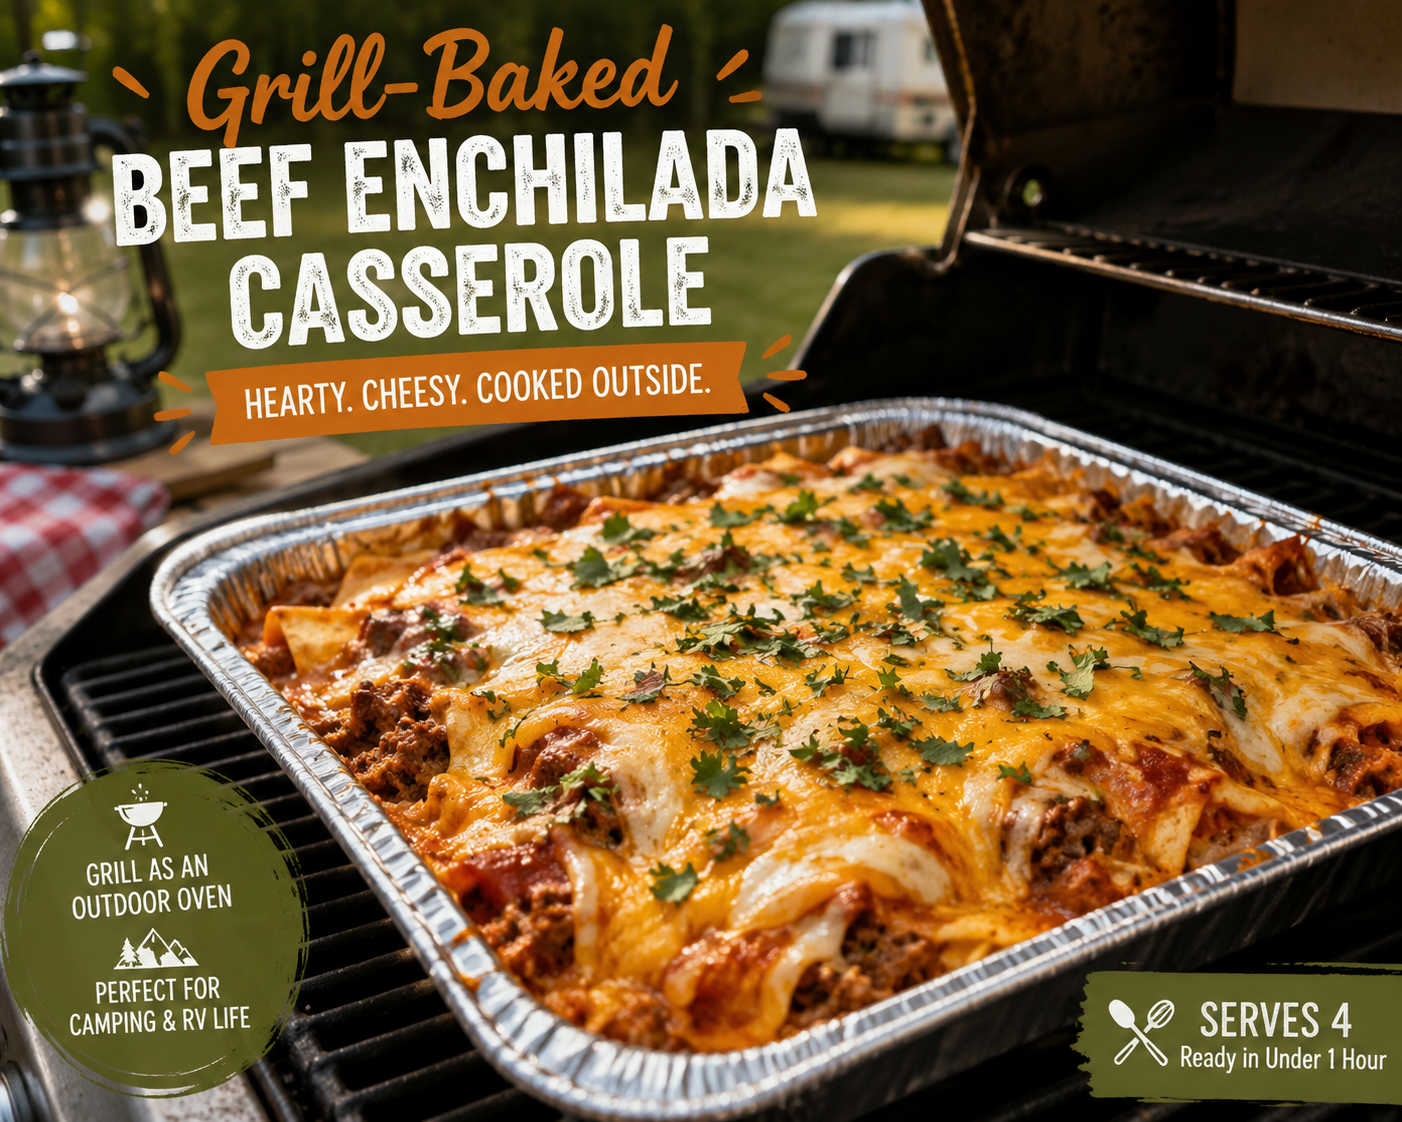
Grill-Baked Beef Enchilada Casserole

If you love the idea of a hearty casserole at the campground but don’t want to heat up the RV, this Grill-Baked Beef Enchilada Casserole is the answer. Cooked in a disposable foil pan over indirect heat, this meal delivers all the flavors of classic beef enchiladas with a fraction of the work. It’s perfect for seasonal campers, RV travelers, and anyone looking to turn their grill into an outdoor oven.

simplegoodfood's avatarsimplegoodfood

Grill-Baked Beef Enchilada Casserole

A foil-pan enchilada casserole cooked over indirect grill heat. Perfect example of using the grill as an outdoor oven.
Prep Time 15 minutes
Cook Time 40 minutes
Total Time 55 minutes
Servings: 4
Course: Dinner, Lunch, Main Course
Cuisine: American
Calories: 520

Ingredients
  

  • 1 pound lean ground beef
  • 1 small onion diced
  • 1 teaspoon chili powder
  • 1 teaspoon cumin
  • ½ teaspoon garlic powder
  • ½ teaspoon salt
  • 1 10-ounce can red enchilada sauce
  • 6 small flour tortillas cut into strips
  • 1 cup shredded cheddar cheese
  • 1 cup shredded Monterey Jack cheese
  • 1 4-ounce can diced green chiles, drained

Method
 

Prepare the Beef
  1. Heat a skillet over medium heat.
  2. Brown the ground beef and onion until the beef is cooked through.
  3. Drain excess grease if necessary.
  4. Stir in chili powder, cumin, garlic powder, and salt.
Assemble the Casserole
  1. Spray an 8 x 8-inch disposable foil pan with cooking spray.
  2. Spread a few spoonfuls of enchilada sauce on the bottom.
  3. Layer half of the tortilla strips in the pan.
  4. Add half of the beef mixture.
  5. Sprinkle with half of the green chiles.
  6. Pour over half of the remaining enchilada sauce.
  7. Top with half of each cheese.
  8. Repeat the layers with the remaining tortillas, beef, chiles, sauce, and cheese.
Grill-Bake
  1. Preheat a gas grill for indirect cooking to approximately 350°F.
  2. Turn off one side of the grill and place the foil pan on the unlit side.
  3. Close the lid and cook for 35–40 minutes, or until bubbly and heated through.
Serve
  1. Let stand for 5 minutes before serving.
  2. Serve with a simple salad, tortilla chips, or campground corn on the cob.

Notes

Storage & Reheating Tips
  • Store leftovers in a covered container in the refrigerator for up to 3 days.
  • Reheat individual portions in a skillet or microwave.
This casserole can be assembled at home, refrigerated in the cooler, and baked at the campground later the same day.

Posted in One-Pot Meals

Dutch Oven Sloppy Joe Casserole

This Dutch Oven Sloppy Joe Casserole takes a classic family favorite and turns it into a hearty campground meal. Savory seasoned beef is simmered in a rich sloppy joe sauce, then topped with fluffy biscuit pieces and baked until golden brown. It’s comfort food at its finest and a perfect meal for feeding hungry campers after a day outdoors.

simplegoodfood's avatarsimplegoodfood

Dutch Oven Sloppy Joe Casserole

This Dutch Oven Sloppy Joe Casserole takes a classic family favorite and turns itinto a hearty campground meal.
Prep Time 15 minutes
Cook Time 35 minutes
Total Time 50 minutes
Servings: 6
Course: Dinner, Lunch, Main Course
Cuisine: American
Calories: 510

Ingredients
  

For the Sloppy Joe Filling
  • pounds lean ground beef
  • 1 medium onion diced
  • 1 green bell pepper diced
  • 2 cloves garlic minced
  • 1 cup tomato sauce
  • ¼ cup ketchup
  • 1 tablespoon Worcestershire sauce
  • 1 tablespoon brown sugar
  • 1 teaspoon yellow mustard
  • ½ teaspoon black pepper
  • ½ teaspoon salt
For the Topping
  • 1 can 16.3 ounces refrigerated biscuit dough
  • 1 cup shredded cheddar cheese

Method
 

  1. Preheat a 12-inch Dutch oven.
  2. Brown the ground beef with the onion and bell pepper until the beef is no longer pink. Drain excess grease if needed.
  3. Stir in the garlic and cook for 1 minute.
  4. Add tomato sauce, ketchup, Worcestershire sauce, brown sugar, mustard, salt, and pepper.
  5. Simmer for 10 minutes, stirring occasionally.
  6. Cut each biscuit into quarters and scatter evenly over the sloppy joe mixture.
  7. Sprinkle with shredded cheddar cheese.
  8. Cover the Dutch oven and bake using approximately 16 coals on top and 8 underneath for 20–25 minutes, or until the biscuits are golden brown and cooked through.
  9. Allow to rest for 5 minutes before serving.

Notes

Campground Tips
  • Brown the beef and prepare the filling at home for even faster campsite cooking.
  • If using a camp oven over a grill, maintain medium heat and rotate the oven occasionally for even baking.
  • Serve with a simple green salad or coleslaw.
Posted in Skillet Meals

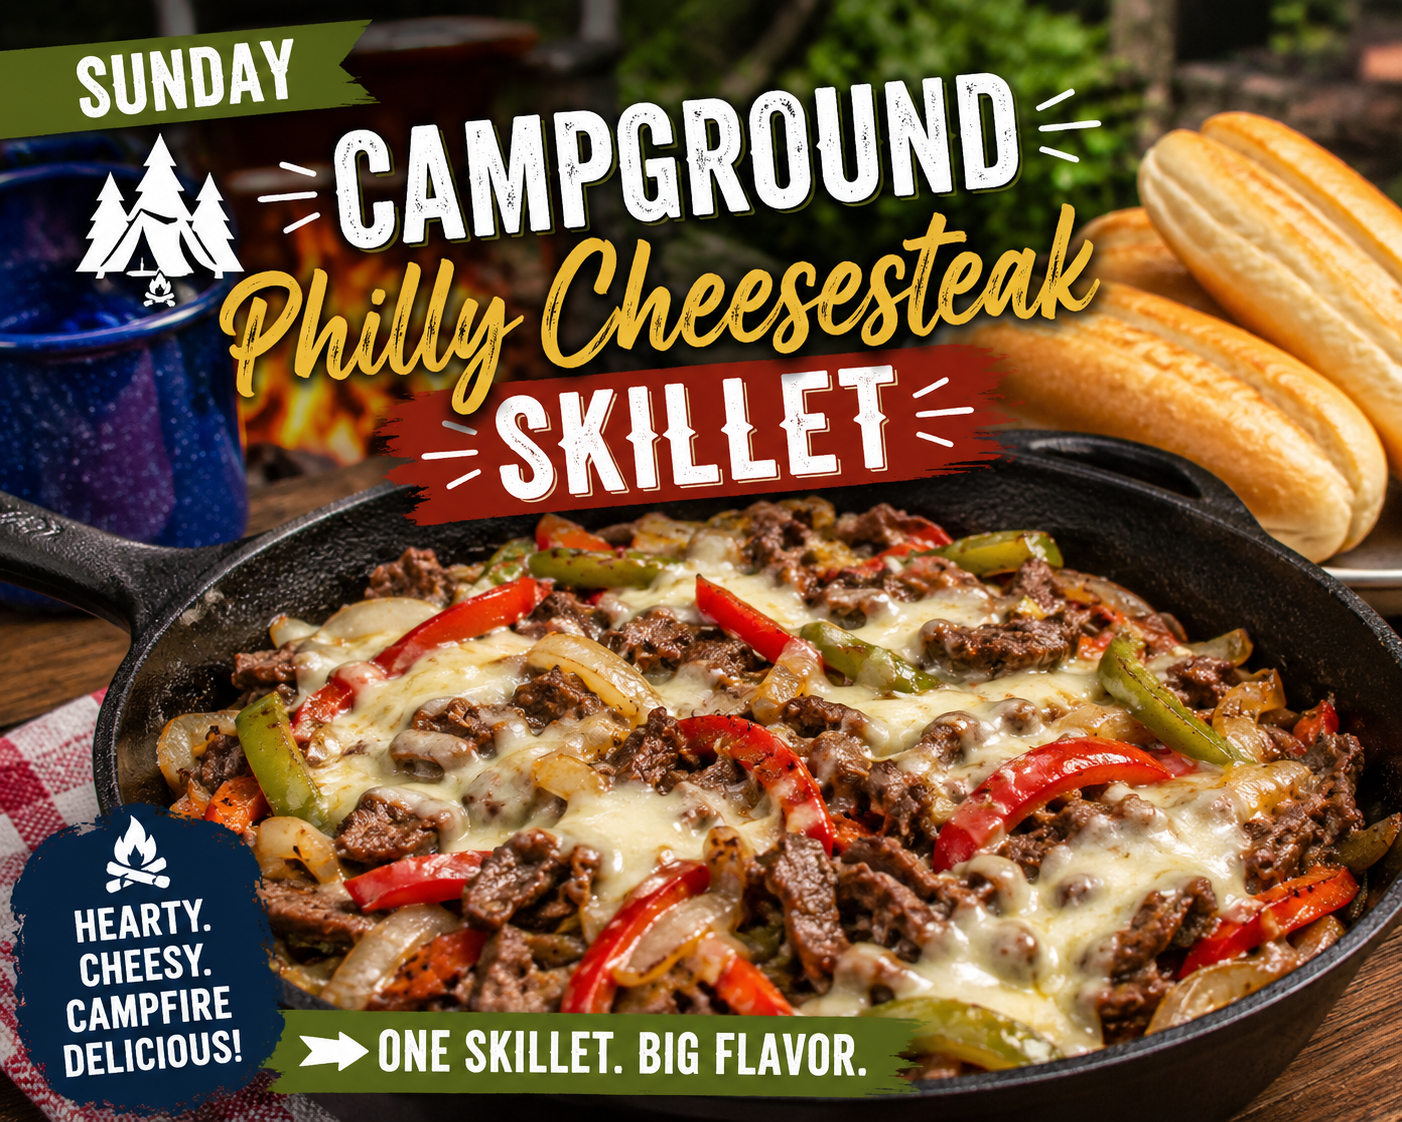
Campground Philly Cheesesteak Skillet

Bring the flavors of a classic Philly cheesesteak to your campsite with this easy one-skillet meal. Tender strips of beef, sautéed peppers and onions, and plenty of melted provolone cheese come together in a hearty dinner that’s perfect after a day of outdoor adventures. Serve it on toasted rolls for a traditional sandwich or enjoy it straight from the skillet for a lower-carb option.

simplegoodfood's avatarsimplegoodfood

Campground Philly Cheesesteak Skillet

ThisCampground Philly Cheesesteak Skillet is loaded with tender beef, peppers,onions, and melted provolone cheese.
Prep Time 15 minutes
Cook Time 20 minutes
Total Time 35 minutes
Servings: 6
Course: Dinner, Lunch, Main Course
Cuisine: American
Calories: 525

Ingredients
  

  • pounds sirloin steak thinly sliced
  • 2 tablespoons olive oil
  • 1 large green bell pepper sliced
  • 1 large red bell pepper sliced
  • 1 large onion sliced
  • 1 teaspoon garlic powder
  • 1 teaspoon Worcestershire sauce
  • ½ teaspoon black pepper
  • ½ teaspoon salt
  • 8 slices provolone cheese
  • 6 hoagie rolls toasted

Method
 

  1. Heat olive oil in a large cast-iron skillet over medium-high heat.
  2. Add peppers and onions. Cook 5–7 minutes until softened. Remove and set aside.
  3. Add steak to the skillet and cook until browned, about 4–5 minutes.
  4. Stir in garlic powder, Worcestershire sauce, salt, and pepper.
  5. Return peppers and onions to the skillet and mix well.
  6. Lay provolone slices over the meat mixture and cover until melted.
  7. Spoon onto toasted hoagie rolls and serve immediately.

Notes

Campground Tips
  • Slice the steak and vegetables at home to save prep time at camp.
  • Freeze the steak overnight before your trip for easier slicing.
  • Serve with kettle chips or a simple pasta salad.
    The steak will be much easier to slice thinly if you place it in the freezer for 30 min before slicing.
Posted in Heat & Eat

Loaded BBQ Chicken Nachos

When you’re camping, quick and easy meals are always a win—and these Loaded BBQ Chicken Nachos deliver big flavor with minimal effort. Layers of crispy tortilla chips, tender chicken, smoky barbecue sauce, melted cheese, and fresh toppings come together in a foil pan on the grill or campfire. They’re perfect for feeding hungry campers after a day of outdoor adventures and make a fun meal everyone can customize to their liking.

simplegoodfood's avatarsimplegoodfood

Loaded BBQ Chicken Nachos

Loaded BBQ Chicken Nachos are a quick and satisfying campground meal featuring layers of tortilla chips, barbecue chicken, melted cheese, black beans, and corn. Easy to prepare and fun to share around the campsite.
Prep Time 10 minutes
Cook Time 15 minutes
Total Time 25 minutes
Servings: 6
Course: Lunch, Snack
Cuisine: American
Calories: 510

Ingredients
  

For the Nachos
  • 1 large bag 13 ounces sturdy tortilla chips
  • 3 cups cooked chicken shredded (rotisserie chicken works great)
  • 1 cup barbecue sauce
  • 2 cups shredded cheddar cheese
  • 1 cup shredded Monterey Jack cheese
  • 1 can 15 ounces black beans, drained and rinsed
  • 1 cup corn kernels fresh, frozen, or canned and drained
  • ¼ cup sliced green onions
Optional Toppings
  • Diced tomatoes
  • Sliced jalapeños
  • Sour cream
  • Avocado or guacamole
  • Chopped cilantro

Method
 

  1. Preheat a grill to medium heat or prepare a campfire with a bed of hot coals.
  2. In a bowl, combine the shredded chicken and barbecue sauce until evenly coated.
  3. Lightly spray a disposable foil pan with cooking spray.
  4. Spread half of the tortilla chips in the pan.
  5. Top with half of the BBQ chicken, black beans, corn, and both cheeses.
  6. Repeat the layers with the remaining chips, chicken mixture, beans, corn, and cheese.
  7. Cover the pan loosely with aluminum foil.
  8. Place on the grill or over indirect campfire heat.
  9. Cook for 10–15 minutes, or until the cheese is completely melted and bubbly.
  10. Remove from heat and sprinkle with green onions.
  11. Add any desired toppings and serve immediately.
Posted in One-Pot Meals

Campfire Chicken & Rice Bake

Nothing says campground comfort food quite like a hearty chicken and rice dinner cooked over the campfire. This Campfire Chicken & Rice Bake combines tender chicken, fluffy rice, vegetables, and a creamy sauce into a satisfying one-pot meal that’s perfect for camping weekends, RV adventures, or backyard campfires. Best of all, everything cooks together in a Dutch oven, making cleanup easy and leaving more time to enjoy the outdoors.

simplegoodfood's avatarsimplegoodfood

Campfire Chicken & Rice Bake

Asimple Dutch oven meal that can be assembled ahead and cooked over the fire.
Prep Time 10 minutes
Cook Time 40 minutes
Total Time 50 minutes
Servings: 6
Course: Dinner, Main Course
Cuisine: American
Calories: 420

Ingredients
  

  • pounds boneless skinless chicken breasts, cut into bite-sized pieces
  • 1 tablespoon olive oil
  • 1 medium onion diced
  • 1 cup carrots diced
  • 1 cup celery diced
  • 2 cloves garlic minced
  • cups long-grain rice uncooked
  • 3 cups low-sodium chicken broth
  • 1 can 10.5 ounces cream of chicken soup
  • 1 teaspoon dried parsley
  • 1 teaspoon dried thyme
  • ½ teaspoon black pepper
  • ½ teaspoon paprika
  • 1 cup frozen peas

Method
 

  1. Heat a large Dutch oven, deep skillet, or stockpot over medium heat.
  2. Add the chicken and cook until lightly browned on all sides, about 5–6 minutes.
  3. Stir in the onion, bell pepper, and garlic. Cook for 3–4 minutes until vegetables begin to soften.
  4. Add the uncooked rice, chicken broth, cream of chicken soup, and seasonings. Stir well to combine.
  5. Bring the mixture to a gentle boil.
  6. Reduce heat to low, cover, and simmer for 20–25 minutes, stirring once or twice during cooking, until the rice is tender and most of the liquid has been absorbed.
  7. Sprinkle the shredded cheese over the top. Cover again for 2–3 minutes until melted.
  8. Remove from heat and let stand for 5 minutes before serving.

Notes

Campground Cooking Note

If using instant rice, reduce the broth by about ½ cup and cook according to the rice package directions. If using a portable camp stove that runs hot, stir occasionally to prevent sticking.

#CampgroundCooking, #CampingMeals, #DutchOvenRecipes, #CampfireCooking, #RVRecipes, #OutdoorCooking, #FamilyCamping, #OnePotMeals, #CampingFood, #EasyDinnerRecipes, #CampfireDinner, #WeekendCamping, #ComfortFoodRecipes, #CampingLife, #CampingRecipeIdeas,